Retrieve Data via REST calls
In the previous post we learned how to grant data access via the Bosch eBike flow page. Now let’s continue with the actual data retrieval.
Step 4: Retrieve data via REST calls
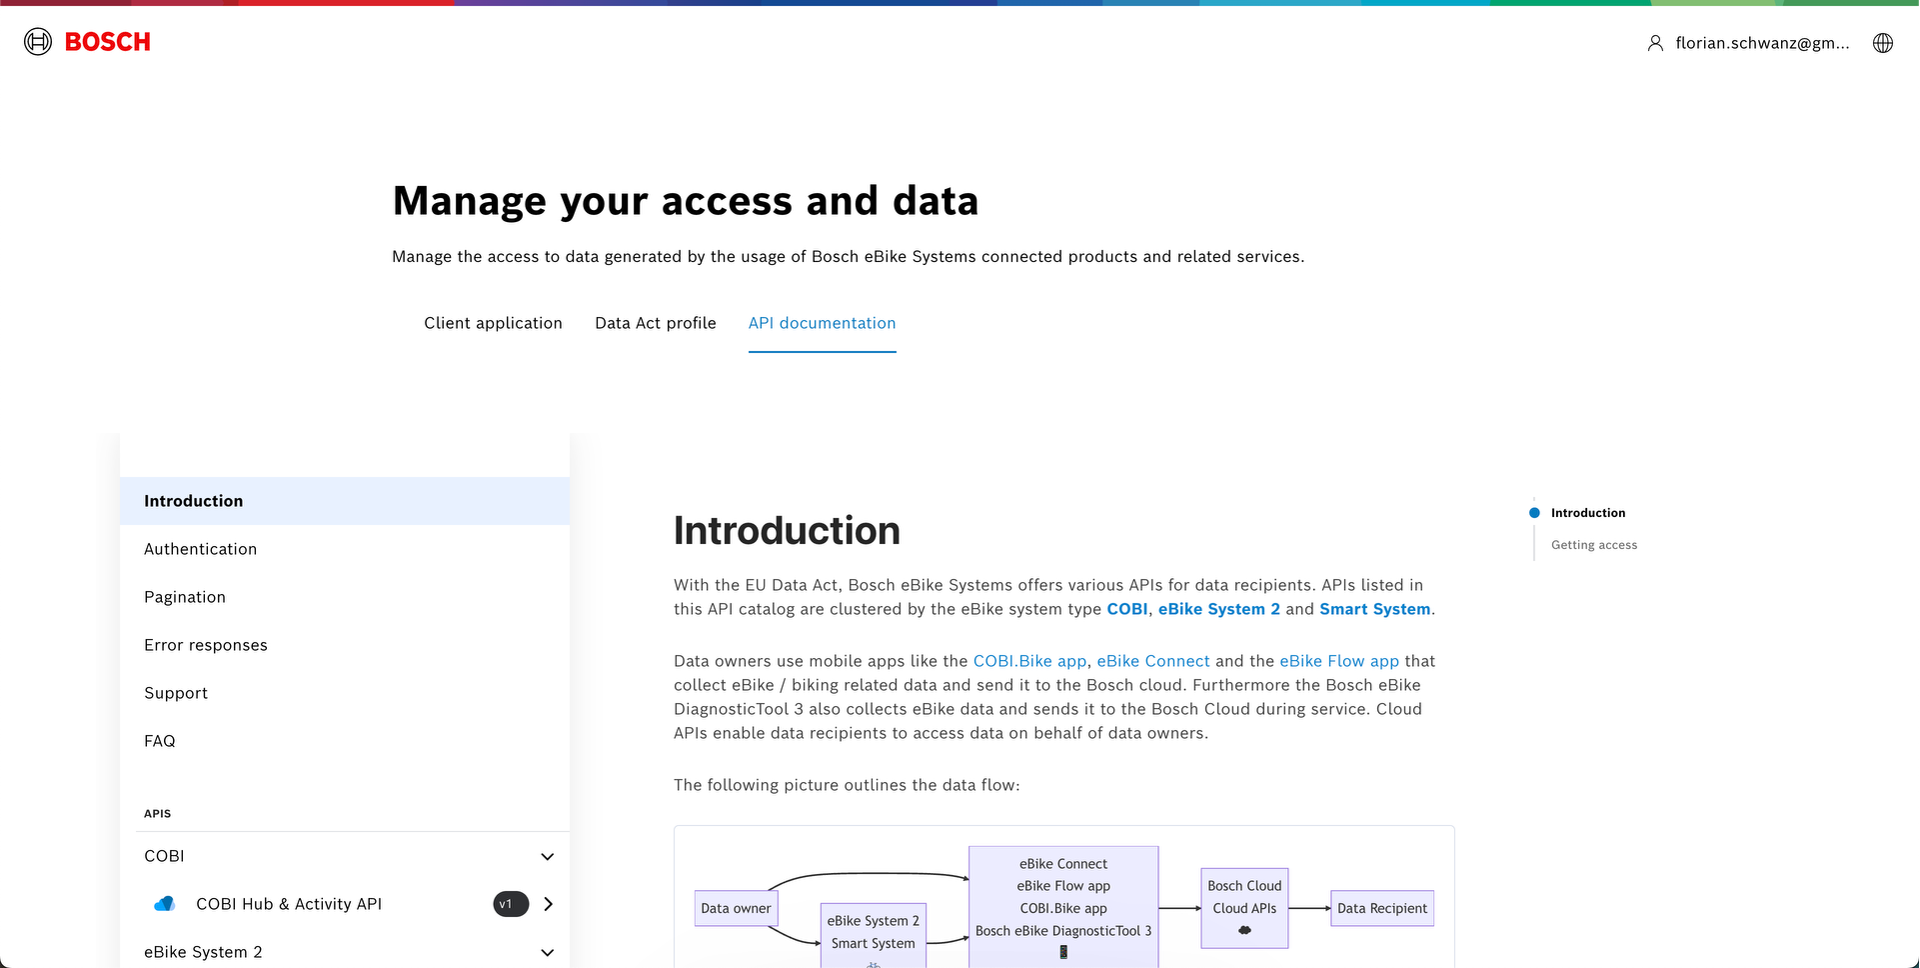
Browsing https://portal.bosch-ebike.com/data-act/app#/introduction we can find the API documentation for the EU Data Act interface. It comprises
- an introduction that explains the basic architecture and the steps to get access (which we already covered in the previous post)
- a description how to authenticate with your user credentials
- a description of the pagination mechanism
- a description of error responses
- the contact information for support cases
- an FAQ section
As our first call we will retrieve all bikes that are registered to our user account using the API documentation Smart System > eBike Profile API > List all eBikes

There are multiple ways to call the endpoint. In the following sections we will explore
For both we need to download the open-ebike-backend from GitHub which contains all necessary configuration files.
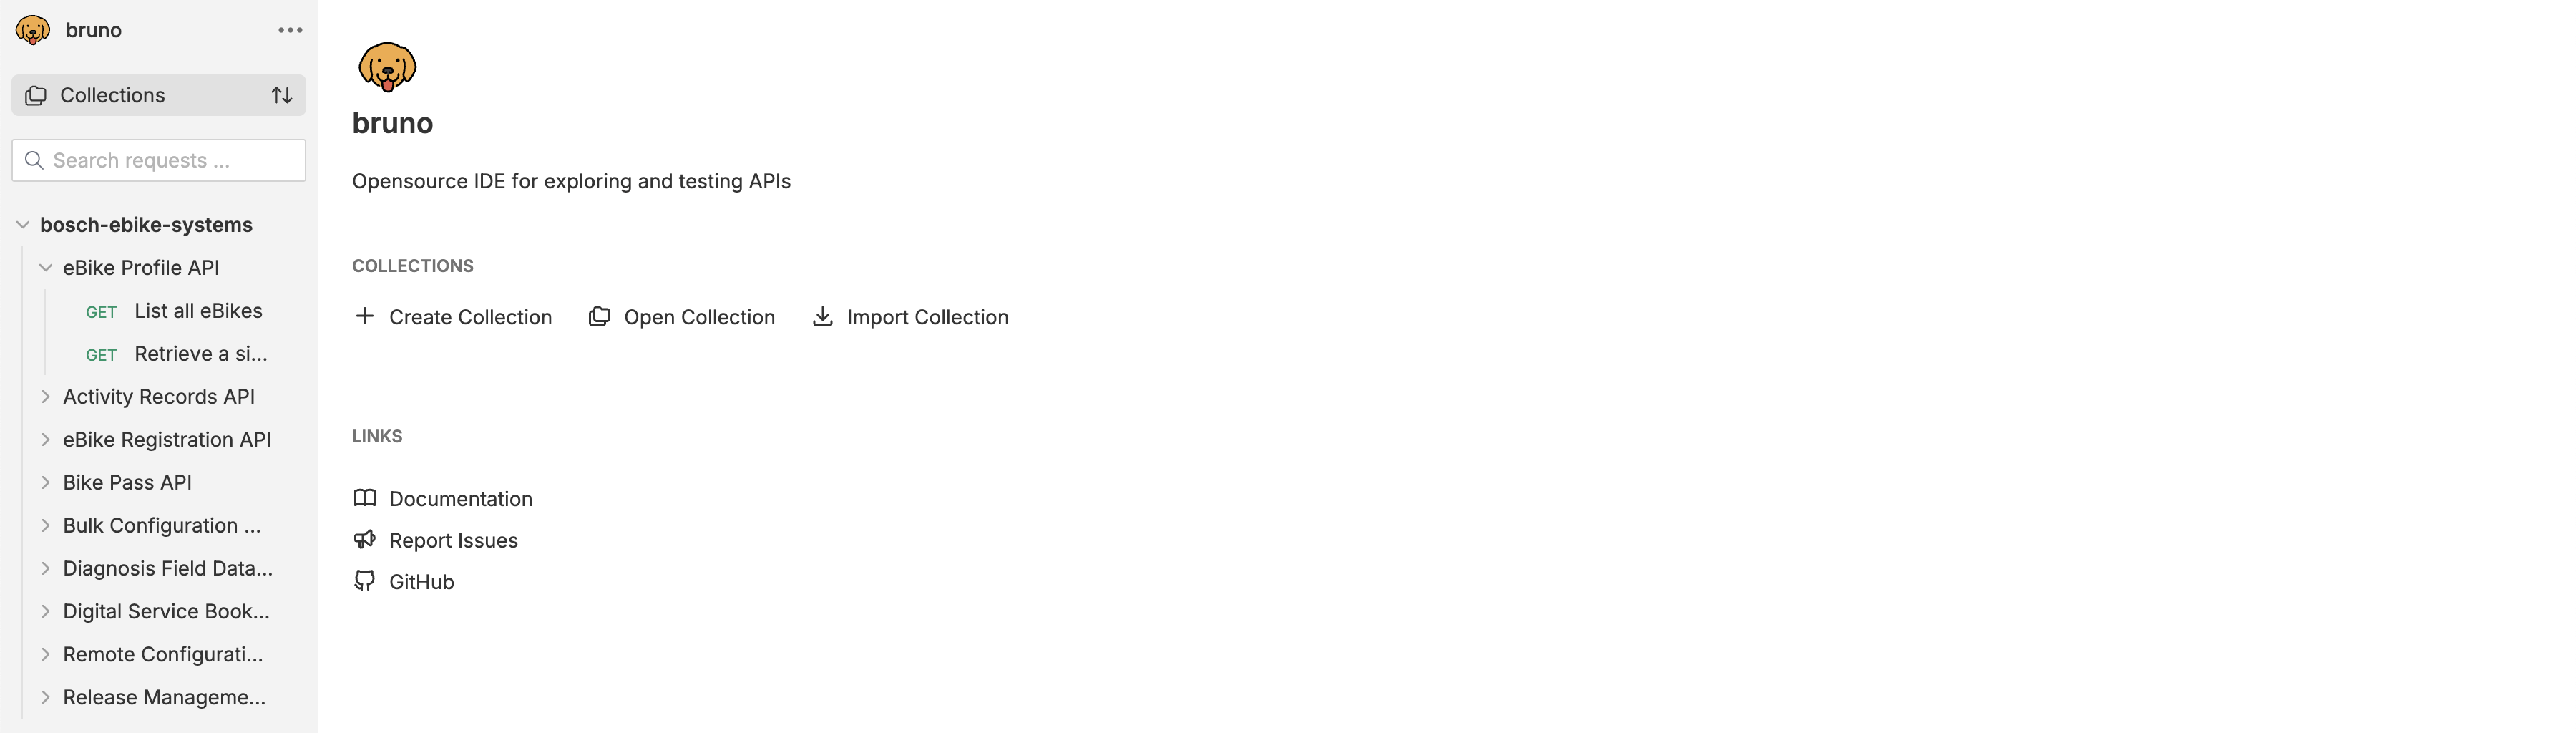
Retrieve data via Bruno
Bruno is an API client that can be used to call REST endpoints. It is available as a desktop app.
After downloading and launching Bruno we need open a collection from open-ebike-backend/bruno/bosch-ebike-systems which will import all available requests.
We need to specify the client ID and client secret of the client application we created in the previous post in the file open-ebike-backend/bruno/.env so that we can use them later.
(Replace the placeholders with your actual client ID and client secret.)
euda-test-confidential-client-id=euda-xxxxxxxx-xxxx-xxxx-xxxx-xxxxxxxxxxxx
euda-test-confidential-client-secret=xxxxxxxx-xxxx-xxxx-xxxx-xxxxxxxxxxxx
Since we want to use the same user authentication for all REST API calls we can define it for the entire collection.
We need to configure OAuth 2.0 with grant type authorization code.
The configuration is based on the client application we created in the previous post.
Note that client ID and client secret are referenced from the .env file.
- callback URL:
http://localhost:4200 - authorization URL:
https://p9.authz.bosch.com/auth/realms/obc/protocol/openid-connect/auth - access token URL:
https://p9.authz.bosch.com/auth/realms/obc/protocol/openid-connect/token - client ID: ``
- client secret: ``
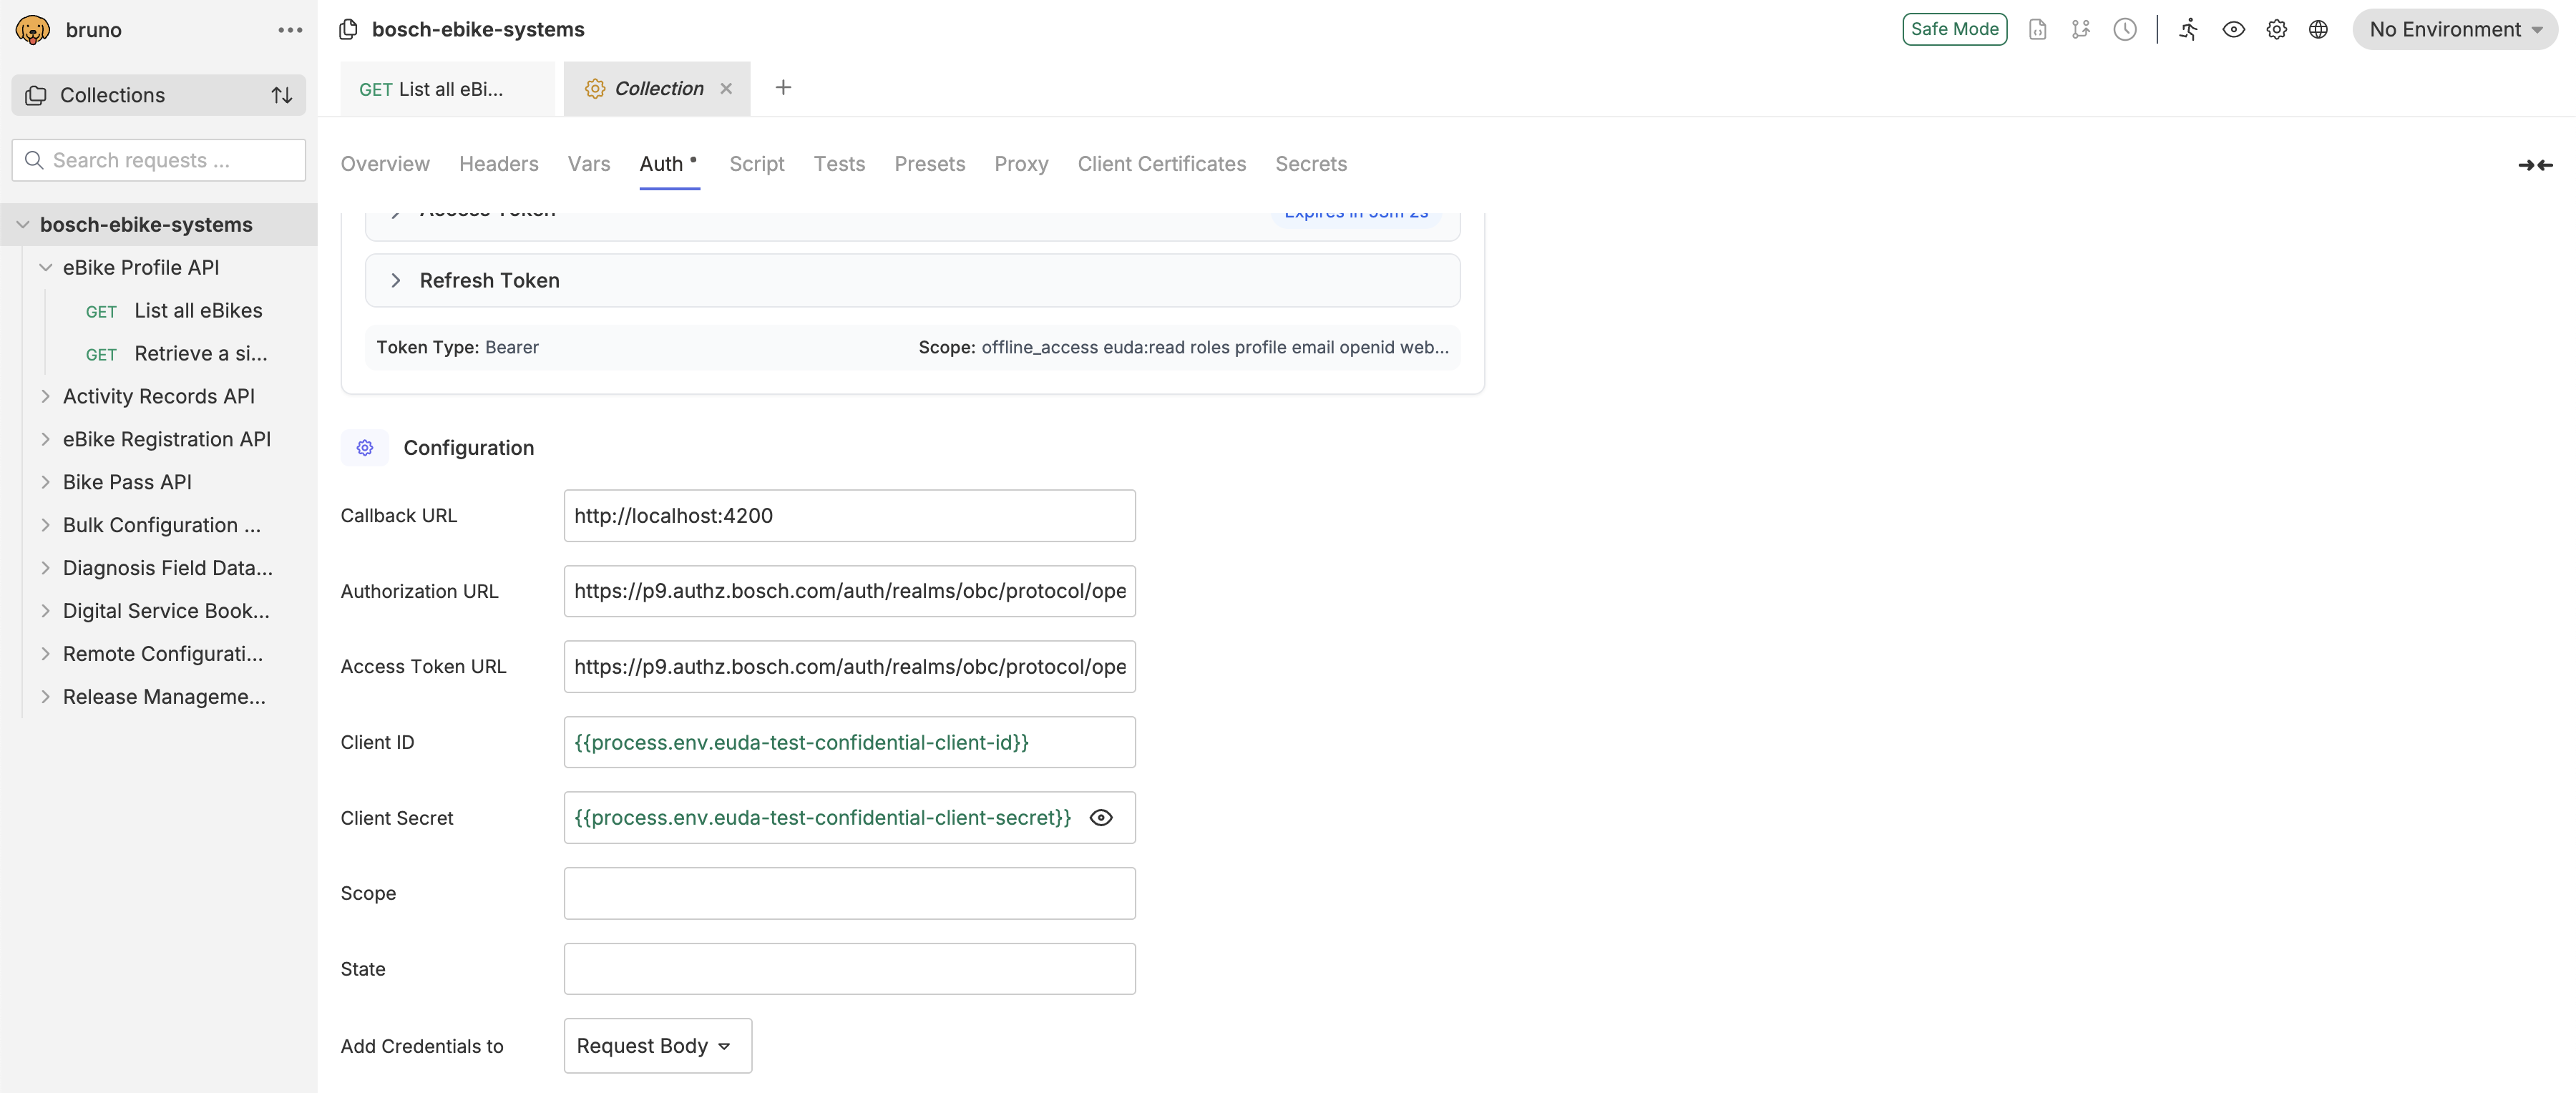
After saving the configuration we can authenticate by clicking on Get New Access Token. This will open a browser window where we can log in with our SingleKey ID credentials and authorize the client application to access our data.
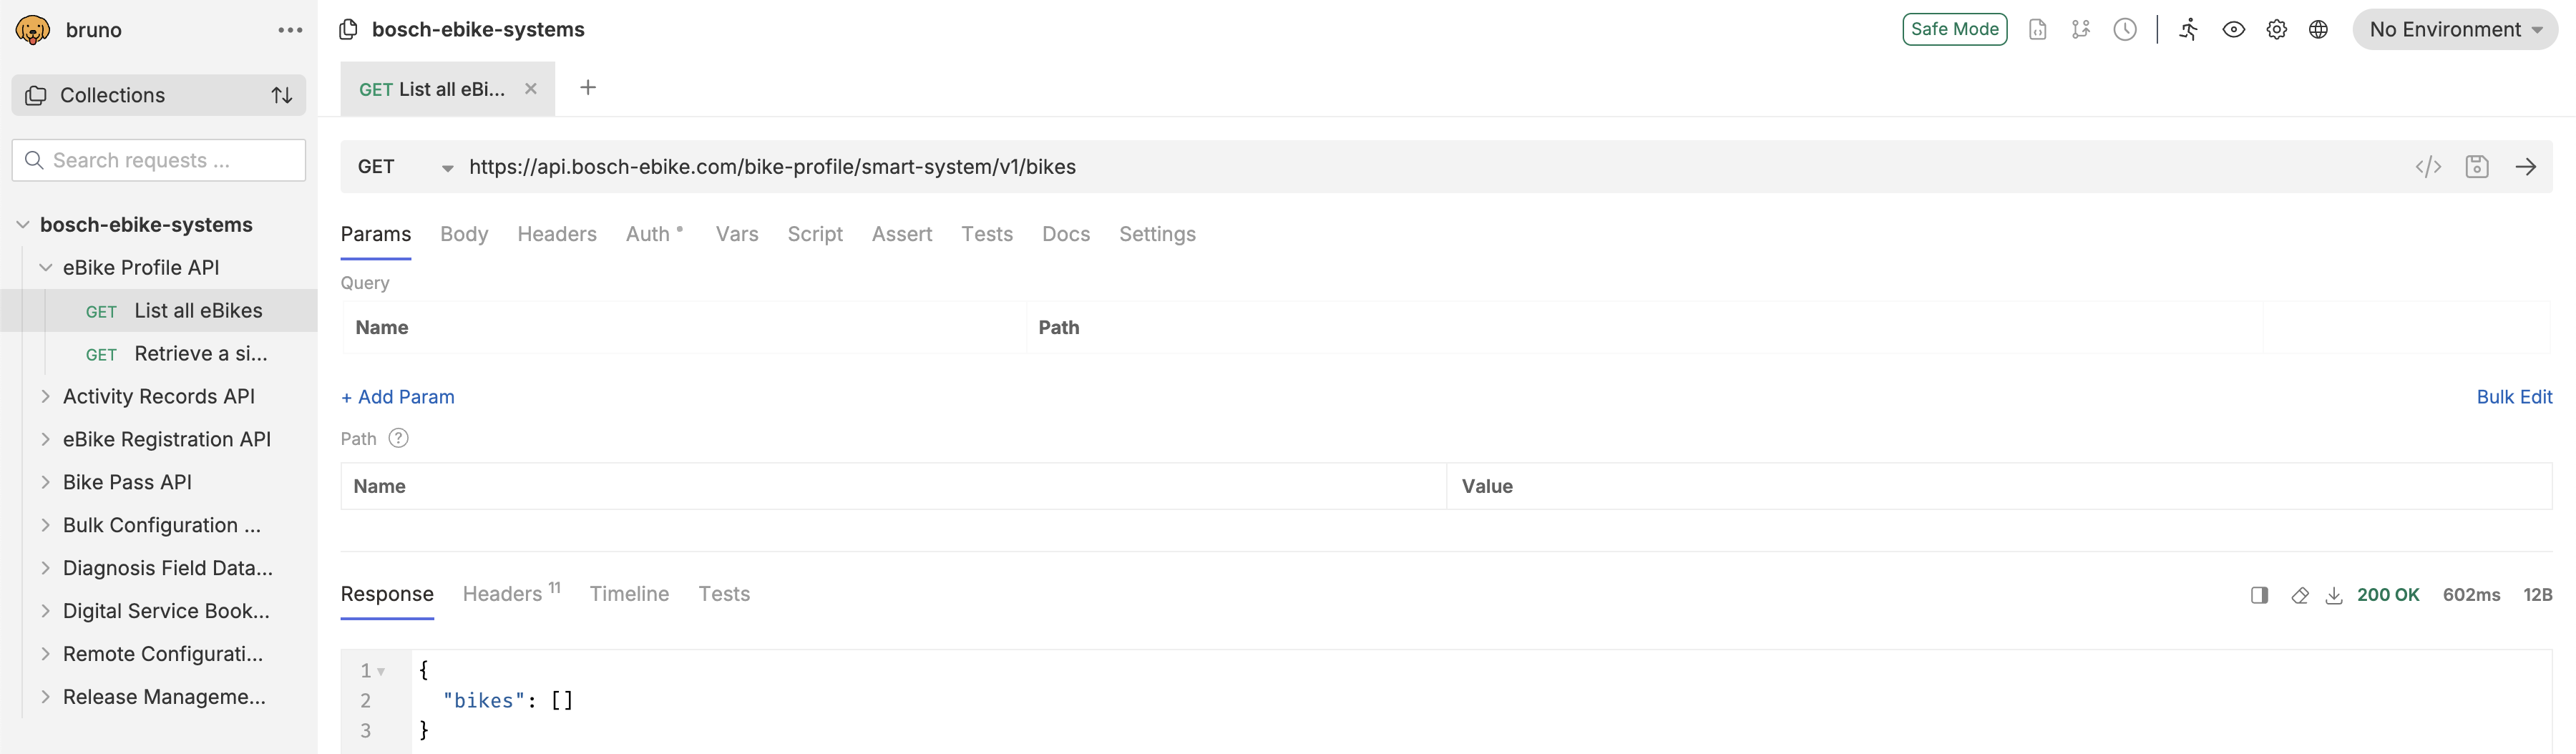
Finally, we can call the endpoint List all eBikes which will return all bikes that are registered to our user account.
You can find it in bosch-ebike-systems > eBike Profile API > List all eBikes in Bruno.
Retrieve data via Jetbrains http client plugin
Another way to call REST endpoints is the Jetbrains http client plugin which is part of IntelliJ IDEA and other JetBrains IDEs.
We need to specify the client ID and client secret of the client application we created in the previous post in the file open-ebike-backend/http/http-client.private.env.json so that we can use them later.
(Replace the placeholders with your actual client ID and client secret.)
{
  "local": {
    "euda-test-confidential-client-id": "euda-xxxxxxxx-xxxx-xxxx-xxxx-xxxxxxxxxxxx",
    "euda-test-confidential-client-secret": "xxxxxxxx-xxxx-xxxx-xxxx-xxxxxxxxxxxx"
  }
}
Since we want to use the same user authentication for all REST API calls we can define it once.
We need to configure an authentication of type OAuth 2.0 with grant type Authorization Code in open-ebike-backend/http/http-client.env.json
The configuration is based on the client application we created in the previous post.
Note that client ID and client secret are referenced from file open-ebike-backend/http/http-client.private.env.json.
{
  "local": {
    "ebike-api-url" : "https://api.bosch-ebike.com",
    "authorize-url": "https://p9.authz.bosch.com/auth/realms/obc/protocol/openid-connect/auth",
    "token-url": "https://p9.authz.bosch.com/auth/realms/obc/protocol/openid-connect/token",
    "refresh-url": "https://p9.authz.bosch.com/auth/realms/obc/protocol/openid-connect/token",
    "Security": {
      "Auth": {
        "euda-test-confidential": {
          "Type": "OAuth2",
          "Grant Type": "Authorization Code",
          "Auth URL": "",
          "Token URL": "",
          "Client ID": "",
          "Client Secret": "",
          "Redirect URL" : "http://localhost:4200"
        }
      }
    }
  }
}
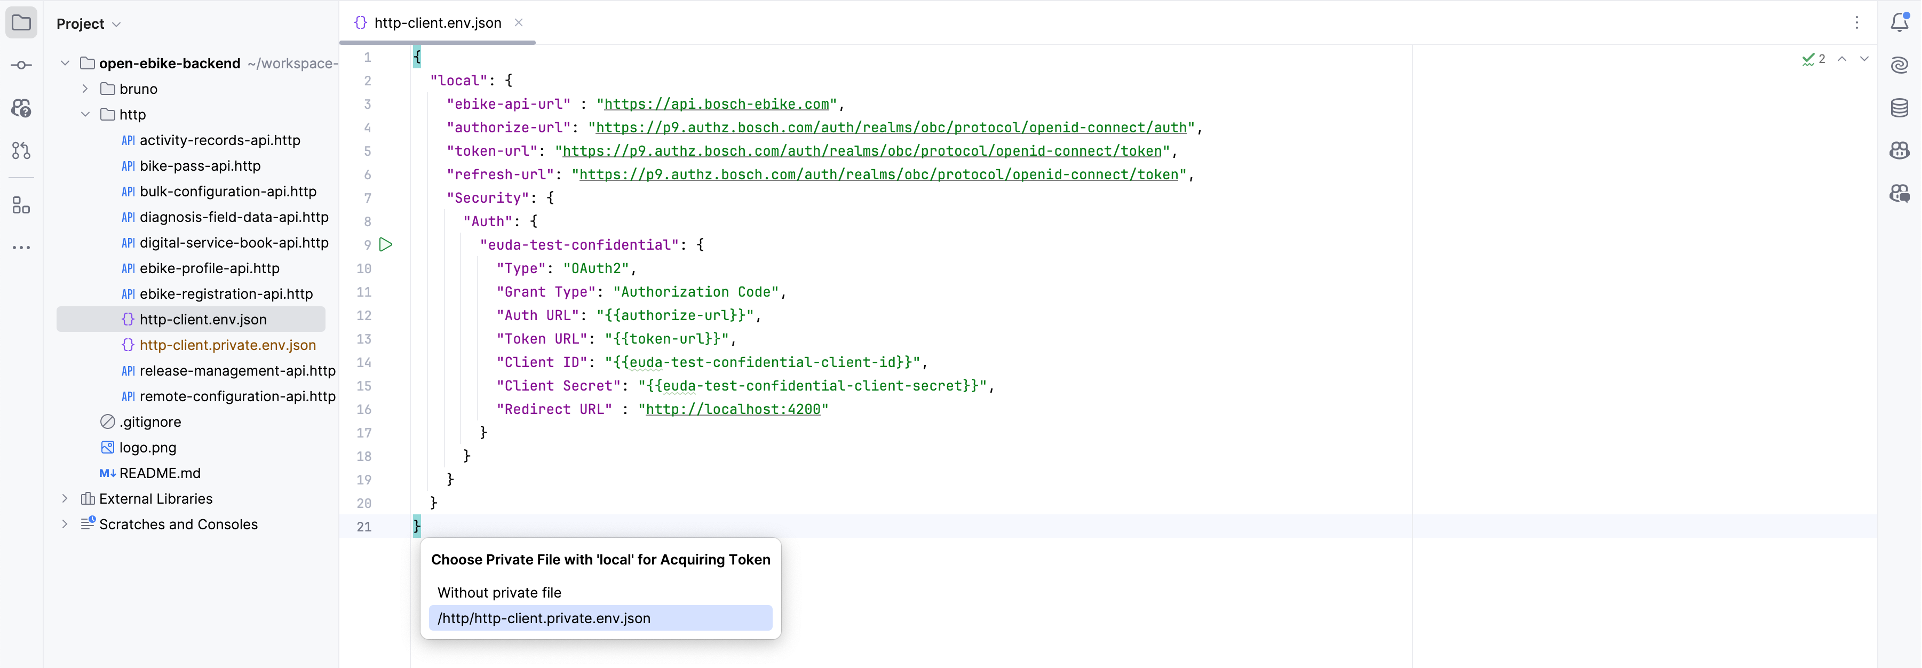
After saving the configuration we can authenticate by clicking on the green arrow icon and on the option to use /http/http-client.private.env.json.
This will open a browser window where we can log in with our SingleKey ID credentials and authorize the client application to access our data.
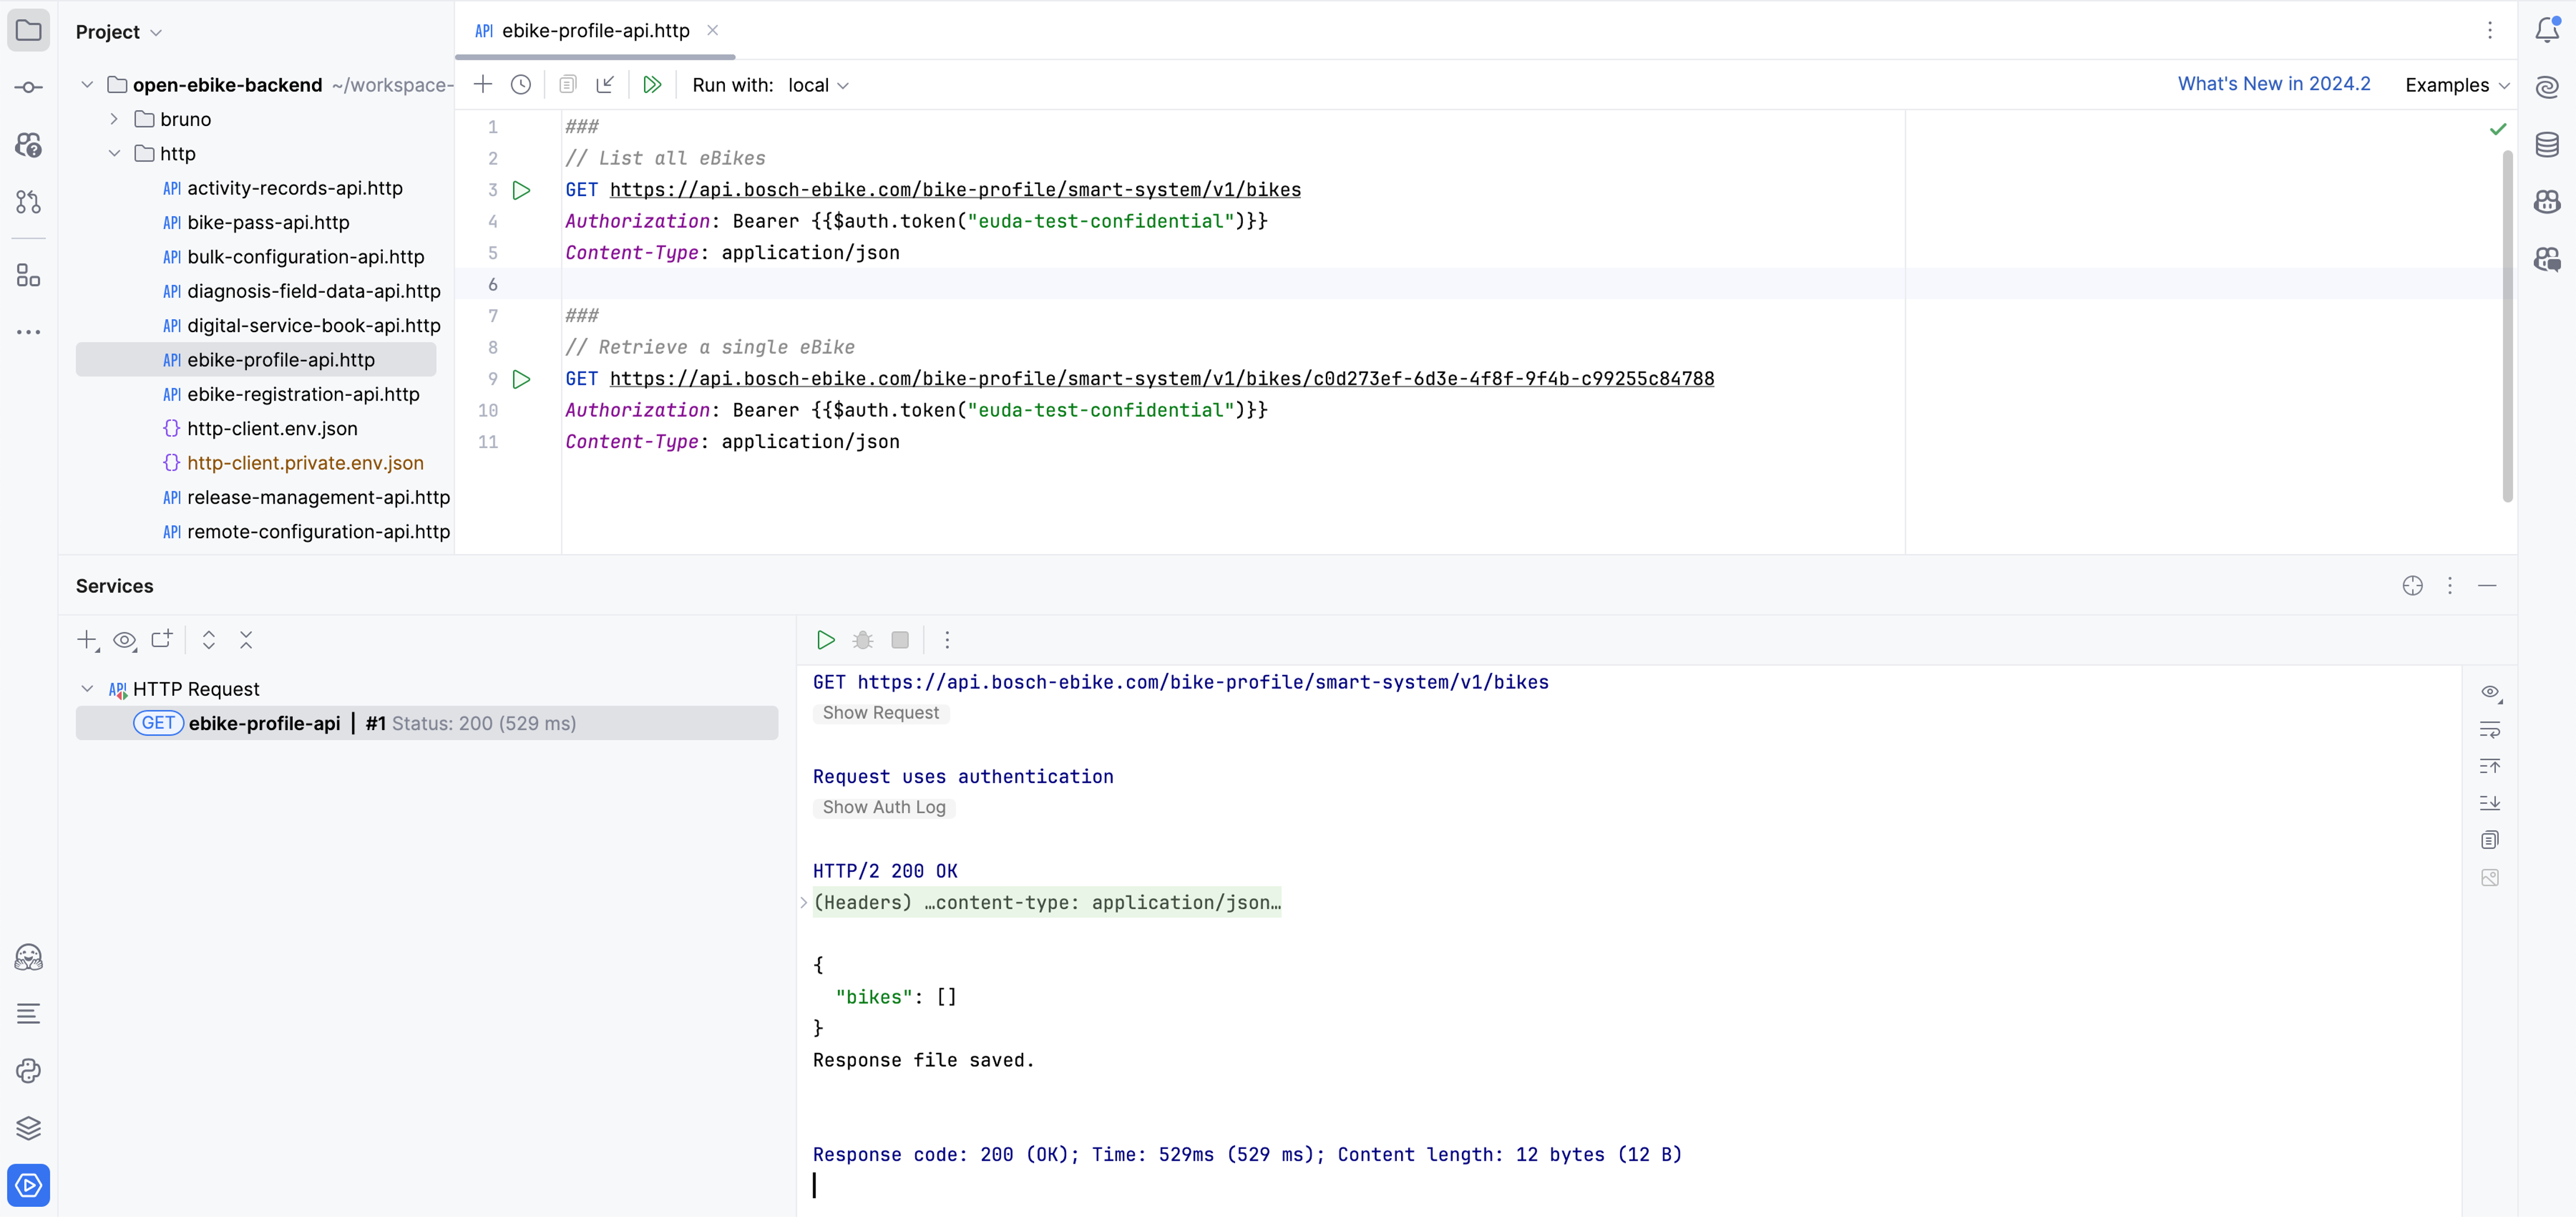
Finally, we can call the endpoint List all eBikes which will return all bikes that are registered to our user account.
You can find it in the file open-ebike-backend/http/ebike-profile.http.
In the next post we will start implementing a web app to display our data.